

Home Grooming The Companion Old
English Sheepdog
Grinding An
Old English Sheepdog's Nails
|
|
You'll find an excellent dog nail photo demonstration
on the Washington State University website-
http://www.vetmed.wsu.edu/ClientED/dog_claws.aspx
 |
|
 |
|
|

|
A Note About Puppies...
I do NOT use an
electric nail grinder on a puppy's nails until after
they're accustomed to having their feet/nails
handled and have been gradually desensitized to the sound and
vibration of the grinder. Instead, I use a standard guillotine
dog nail clipper and a cardboard emery board.
The day a
puppy arrives in our home, we begin play grooming...
nightly combing, ear checking and foot handling. I begin by briefly playing with the feet, gently rubbing the toes and
between the pads. Food rewards or a special toy given
only at this time can make it fun for the pup. I
then introduce a cardboard fingernail file. Just
one sweep across each nail tip and that's it for the
day. I repeat it every night until the puppy is
comfortable with this handling.
I then introduce the
guillotine nail clipper. I first pretend-clip
them. Just going through the motion of pretend
clipping by touching the end of the nail clipper to the
top of the nail and making the clip.
If the puppy is accepting
all of this and
the nails are long enough to
be trimmed, I then begin to actually clip the nails. In order to take off only
the desired amount of nail, I use my thumb and index finger as a
stop... only the portion of the nail that extends beyond
my thumb and index finger can be cut off. Holding
the nail this way helps prevent accidentally taking off
too much of the nail if the puppy should move. I
then round up the nail with an emery board. If the
puppy tolerates it, I do all the nails... otherwise,
I'll just do one and another the next night until all
have are completed.
Note that there are
other types of clippers that have a built in stop
which allows you to only remove thin slices with
each cut.
|
|

|
|
|
 |
|
 |
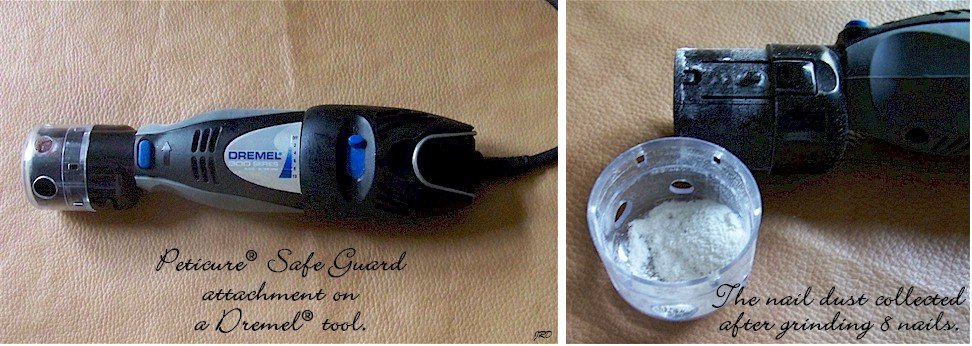
Using a
Dremel® Tool and Peticure® Safe Guard To Grind Nails
I use the Peticure® Safe Guard attachment on a
Dremel® tool to grind my dogs' nails. I feel it gives a little better
protection to the dog because the sandpaper drum and moving parts are covered
except for the small circular area that actually does the grinding. The
attachment also collects a lot of the nail dust in the cup.
Note that this attachment only fits certain Dremel®
tool models. See the manufacturer's website for
details and complete
information-
http://www.peticure-grooming.com/Peticure-Safe-Guard_p_0-14.html
* If you're considering a battery operated
grinding tool, speak with the manufacture or someone who's used the
tool before on a large breed dog to see if it will have enough power to
do all the nails and more in one sitting.
Avoiding Pain From Friction...
Have you ever quickly dragged a knee across carpet
and experienced the discomfort of a friction burn? The friction caused by
grinding nails also generates heat and can be painful to the dog. So I
only leave the sandpaper grinding drum in contact with the nail for a very short
time... a matter of just a few seconds if the nails are longer and just a couple
of seconds as I get close to the desired length and closer to the nail quick.
The revolution speed of the drill also affects the
heat generated by grinding. Visit the Peticure®
website for current
information but at the time of compiling this information they recommended this
speed-
"DO NOT USE MORE THAN 10,000 RPMS WITH ANY ROTARY
TOOL! 5,000 RPMS IS RECOMMENDED"
Note the RPM = Revolutions Per Minute... the speed at which the drum rotates.
|

|
Avoid The
Nail Quick!
Determine the approximate location of the nail quick before
beginning. The following website has a great dog nail photo
demonstration I'd recommend before trimming any dog's nails-
http://www.vetmed.wsu.edu/ClientED/dog_nails.aspx
. The nail quick is easier to see in white nails,
impossible to see in black nails. If you accidentally
hit the quick, it's said there will be pain and a lot of
bleeding. For this reason, I always err on the side of
caution and leave the nails slightly longer than necessary.
The best advice is to proceed very slowly and take off only
small amounts of nail each time the grinder makes contact
with the nail until you thoroughly get to know the proper
length. Keep styptic powder close at hand just in
case. If in doubt, use an emery board (nail file) to finish
up.
|
|
|
Keep Hair Away From The
Grinder's Moving Parts!
This goes for yours too... if you have long hair, be sure
you put it up!
No matter what electric or battery tool you use to grind nails, be very
careful that you do not get the dogs or your own hair near the revolving drum or the shaft it's
attached too. Some tools might automatically shut down, others may wrap
any caught hair in the shaft of the tool and rip the hair out
causing pain or injury. If this were to happen, you would not only harm the dog
physically but you'd also loose their trust. So keep all hair away from the
grinder's moving parts. |
The photo demo below shows
the grinding of just one toe.
When I do a dog's nails, I do one pass on each nail
on both front feet or each nail on both back feet. I grind for a few
seconds on a toenail, then move on to the next one until I've done all 8-10 nails. I then go back and
do each of them again in the same manner until I've reached the desired length.


I use a cardboard
finger nail file or emery board to finish the nails. I
round up the tip to take off all sharp edges... I also drag the
emery board under the front of the nail for the same reason.
I check the nail for sharp edges, then move on to the next one.
If you have an Old English Sheepdog that scratches itself a lot
due to allergies, rounding up the nails will help a little in
preventing the dog from damaging the skin when he/she scratches. It helps prevent painful scratches on us
too if a dog paws or jumps up to greet us.
Just an interesting side note... white nails can
gradually turn black as the Old English Sheepdog ages.
Copyright 2010- J.
Dunne. All rights reserved. The photographs and
instructions on this page are the property of the author. Do not
reproduce or copy for public use without written permission from the author.
|


